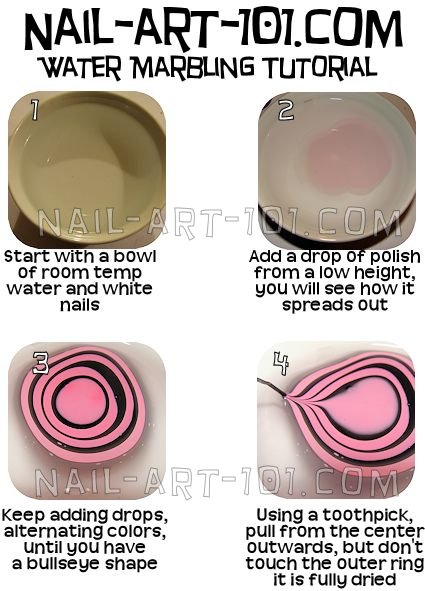
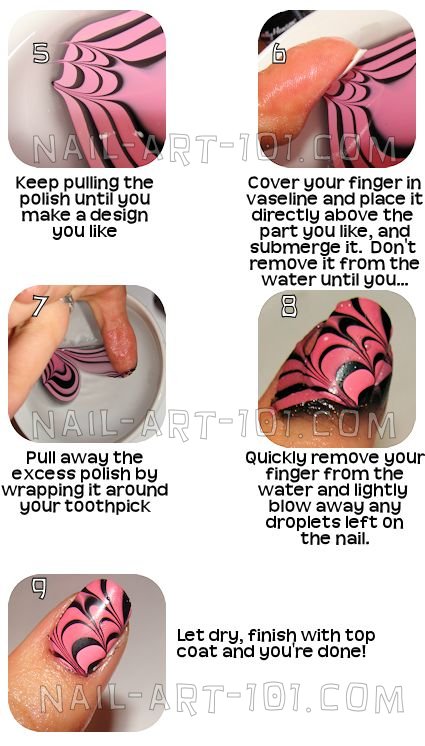
Once the polish spreads out into a circle place a drop of polish in another color on top and swirl a toothpick through the circle to create the marble effect. Paint nails with a base coat and apply moisturiser on the skin surrounding the nail.
Take a toothpick or a thin wooden stick and swirl the dots and slightly.

Nail art in water step by step. Spray with fast drying spray if you want. Gather all the materials you will need. Now make dew drops or rain drops.
Clear water at room temperature preferably filteredbottled water. This is another very beginner friendly easy water marble design. Draw the brush out of the first nail varnish bottle keeping the brush loaded with polish.
Pour a little of top polish on a dry surface and this will facilitate your task. Im using only two colors for this design but you can use. Steps to make water marble nails art step 1.
Paint your nails with one or two coats of a white opaque nail polish. To create a marble nail effect using water start by filling a cup with room temperature water and dripping 1 drop of nail polish onto the surface of the water. Water marble nail art without water dry marble step 1.
Loosen all the lids of the polishes you are going to be using. Nail it water marble manicure step 1. Put sticky tape around your skin and cuticles.
Paint your nails with the white nail varnish. Be sure that the tape dosent touch. For this tutorial i used some of the really opaque polishes so i only added a coat of opi sweet heart as a base very sheer milky polish.
Apply a second bright color in a couple of small dotsblobs dropped directly. I recommend 2 coats. Water marble nail art step by step.
Dip the dotting tool into the top polish and starting making the drops on the nails in a random order. Paint your nails with a clear base coat. Water marble nail art step 1.
Wait until the first layer dry before applying the second layer. If the colors youre using are sheer put a coat of opaque polish as a base before water marbling so the colors will stand out more. If your room is super hot you can leave the water outside for a few hours to cool.
An unwanted cup preferred or old bowl. In this video im explaining how to achieve this look step by step. Your chosen nail polish colors for free dropping.


0 Response to "Nail Art In Water Step By Step"
Post a Comment